Master the Art of Using Vinyl Transfer Tape: Your Complete Guide
In the ever-evolving world of DIY projects, crafting, and personalized gifts, vinyl transfer tape has become an indispensable tool. Whether you're customizing a t-shirt, creating a decal for your car, or designing homemade decorations, mastering vinyl transfer tape can take your projects to the next level. If you’ve ever been stumped by vinyl that refuses to stick, or wondered how to flawlessly transfer a meticulous design from your cutting mat to your desired surface, you’re in the right place! This guide is designed to unravel the mysteries surrounding this versatile medium.
What is Vinyl Transfer Tape?
Vinyl transfer tape, also known as application tape, is a sticky-backed tape used to transfer vinyl decals and graphics from their backing paper onto another surface. It acts as a bridge between your vinyl and its final destination, holding everything in place as you position and transfer your design.
Types of Vinyl Transfer Tape
- Paper Transfer Tape: This is more budget-friendly and works well for basic projects. It’s easier to tear and reposition, making it ideal for beginners.
- Clear Transfer Tape: Allows for precise positioning since you can see through the tape as you work. This is particularly useful for intricate designs or layered vinyl projects.
- Grid-lined Transfer Tape: Provides alignment guides, which are essential for maintaining straight lines and evenly spaced designs.
How to Choose the Right Transfer Tape
Choosing the right transfer tape can make or break your crafting experience. Here's what to consider:
- Project Complexity: For detailed and multi-layered designs, clear or grid-lined tapes are recommended for precision and ease of alignment.
- Surface Material: For textured surfaces, a stronger adhesive might be necessary to ensure the vinyl sticks.
- Vinyl Type: Different vinyl types (permanent, removable, glitter, or holographic) may require different tapes. Always check the recommendation of your vinyl provider.
Step-by-Step Guide to Using Vinyl Transfer Tape
Step 1: Prepare Your Design
Start by preparing your design using a vinyl cutter machine. Once cut, the vinyl should be weeded, which means you carefully remove any excess vinyl, leaving only your design on the backing sheet.
Step 2: Cut the Transfer Tape
Cut the transfer tape to the size of your design, leaving a little extra room on the sides. This ensures that the entire design is covered and fully supported during the transfer.
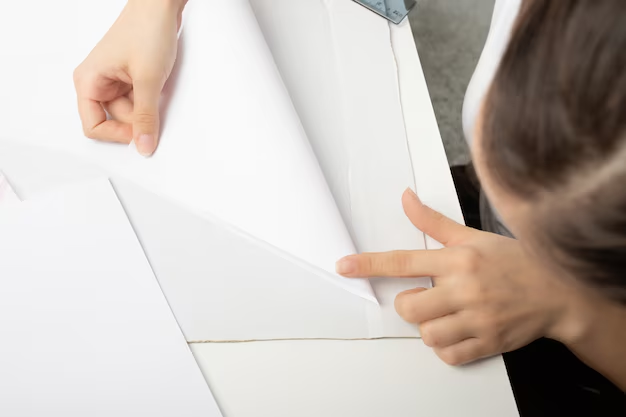
Step 3: Apply the Transfer Tape
Peel the transfer tape from its backing, then carefully place it over your vinyl design. Use a squeegee or a similar tool to firmly press the tape onto the vinyl, smoothing out any air bubbles. Make sure every part of the design adheres well to the tape.
Step 4: Remove the Vinyl Backing
Gently peel away the vinyl's backing paper, making sure that the vinyl sticks to the transfer tape. If pieces of vinyl remain on the backing, press the tape down again and retry.
Step 5: Position and Apply the Design
Align your design above the target surface. If using grid-lined tape, use the lines to ensure straight placement. For intricate designs, consider the "hinge method": attach one edge first, then slowly lower the design onto the surface.
Step 6: Remove Transfer Tape
Slowly peel the transfer tape away, starting from one corner and moving at a 45-degree angle. Ensure the vinyl adheres to the new surface. If not, press the tape back down and squeegee over the section again.
Common Challenges and Solutions
Problem 1: Vinyl Won’t Stick to Tape
- Solution: Ensure the transfer tape has adequate adhesive strength and press firmly over the design with a squeegee.
Problem 2: Air Bubbles Under Vinyl
- Solution: Smooth the vinyl gently with a squeegee or credit card from the center outward to push bubbles to the edges.
Problem 3: Misalignment of Design
- Solution: Use the grid lines on transfer tape for precise alignment, or apply the hinge method for better control over placement.
Tips for Advanced Techniques
- Layering Designs: Use clear transfer tape for better visibility. Apply the bottom layer first and work upwards.
- Textured Surfaces: For rough textures, consider heating the vinyl slightly with a hair dryer for better adherence.
- Detailed Work: Use a fine-point pen to draw guidelines on the tape’s grid, ensuring consistency when working with multiple layers or intricate details.
Vinyl Transfer Tape: Dos and Don'ts
- DO use a squeegee for smooth applications.
- DON'T rush the removal of the transfer tape.
- DO test a small piece on unfamiliar surfaces.
- DON'T apply vinyl to cold surfaces; room temperature is best.
Key Takeaways for Effortless Transfers 🎨
- Choose the Right Tape: Select based on your project needs—paper, clear, or grid-lined.
- Prep Carefully: Ensure your surfaces are clean and your designs weeded perfectly.
- Utilize the Hinge Method: For large or complex designs, increase accuracy.
- Mind the Environment: Work in a clean, temperature-controlled space.
Mastering vinyl transfer tape requires a bit of practice and patience, but once you get the hang of it, there’s no limit to what you can create. From personalized mugs to intricate window decals, vinyl crafts can add a special touch to your projects. Remember, the key to success lies in understanding your materials and applying them with care.
Now that you're equipped with the knowledge to tackle any vinyl project, why not dive into a new creation today? You'll find that the satisfaction of crafting something unique is like no other! Happy crafting!
Related Topics
- How Can I Transfer Data From One Laptop To Another
- How Can I Transfer Domain To Godaddy
- How Can I Transfer My Calls To Another Phone
- How Can I Transfer Pdf To Word
- How Can We Transfer Data From One Laptop To Another
- How Can You Transfer Data From One Phone To Another
- How Can You Transfer Emails From One Account To Another
- How Can You Transfer Vhs Tapes To Dvd
- How Do I Transfer a Prescription From Walgreens To Cvs
- How Do I Transfer Data From Ipad To Ipad